


How To Up Your PB&J Game
Unlocking the secrets of the beloved American classic

Hi! If you're new here, welcome to Dish Lister! This newsletter offers curated recommendations, honest reviews, and inspiring recipes designed to bring joy to both eating in and dining out. Whether you're a seasoned foodie or simply looking to try something new, there's always something delicious to discover. Subscribe today and add a little inspiration and excitement to your food routine!
Nothing transports me back to my childhood quite like a peanut butter and jelly sandwich. This humble creation not only evokes vivid memories of elementary school lunches eaten out of my metal Snoopy lunchbox, but also represents one of my earliest kitchen triumphs—a recipe I could confidently make on my own. More than just a favorite lunchtime staple, those sticky-sweet layers between slices of white bread symbolize an early rite of passage: my first steps toward culinary independence.
PB&J has a history that dates back to World War II. During the war, U.S. soldiers were given peanut butter, jelly, and bread in their rations, as these foods were portable, energy-packed, and had long shelf lives. After the war, the sandwich exploded in popularity among civilians, quickly becoming a budget-friendly staple and a beloved favorite in American households, especially among children.
While PB&J may be simple at its core, it has surprising depth—from choosing the best ingredients, to mastering the construction techniques, to experimenting with creative twists that elevate the experience. Today, I’m diving into every delicious facet of this iconic sandwich and sharing the art of crafting the perfect PB&J.
What follows is my tried-and-true method, honed over years of taste tests and fine-tuning. I’ve put a lot of thought into this analysis, and I hope you enjoy reading it as much as I’ve enjoyed creating it.
Ok, let’s dish!
1. Ingredient deep dive
BREAD:
Let’s start with the base—the bread.
Choosing the right bread for the perfect PB&J is largely a matter of personal taste. Whether you prefer white, whole wheat, multigrain, sourdough, potato, egg, or even raisin bread, there are many great options. That said, I usually go for something with a softer, less dense texture and a mild flavor; you want something that won’t overpower the real stars of the show—the peanut butter and jelly. For this reason, strong flavored breads like rye and pumpernickel aren’t ideal for me, but pretty much anything else is fair game.
I also think it’s important to choose bread slices with a medium thickness—not too thin, but not so thick that they overpower the other ingredients. The bread should be sturdy enough to support the fillings and prevent any seepage or leakage, but soft enough to let the peanut butter and jelly really shine. My personal favorite is brioche—a soft, buttery bread made with eggs, like the sliced version you can find at Trader Joe’s. It leans toward the thicker side of the mid-range spectrum, but its pillowy softness makes it an ideal choice.
If you do go with a thicker or denser slice of bread (like a big slice of challah or a hearty cut from a sourdough loaf), I recommend making your PB&J open-faced to maintain the ideal bread-to-filling ratio.
To toast or not to toast? There’s definitely a time and place for toasted bread—but not in a classic PB&J, where the goal is a soft, comforting bite rather than a crunch. At the same time, I’m a big fan of peanut butter on toast, an open-faced PB&J on a toasted bagel, and, when it’s done right, a griddled peanut butter and banana sandwich, which can be absolutely wondrous.
PEANUT BUTTER:
As a self-described, full-fledged peanut butterholic, choosing the right peanut butter is perhaps the most important decision I make. It truly sets the tone for the entire sandwich experience.
Sweetened vs. Unsweetened: Hot take: my ideal PB&J is made with unsweetened, natural peanut butter. I find that the sweetness from the jelly, jam, or preserves is more than enough, and fruit spreads pair especially well with the saltiness found in many natural peanut butters. My kids prefer peanut butters with added sugar, and I get it—lots of people do (and that’s totally okay). But when I make sandwiches for my boys with unsweetened peanut butter, they gobble them up and usually don’t even notice the switch.
Smooth vs. crunchy: This one comes down to pure preference. Some days (okay, most), I’m all about smooth, creamy peanut butter for PB&Js, while other times, when I crave a little more texture, crunchy is where it’s at. There’s really no wrong answer here. Try, however, to avoid flavored peanut butters (like those with added maple syrup, maple sugar, or honey), as they can compete with the jelly and result in an overly sweet final product.
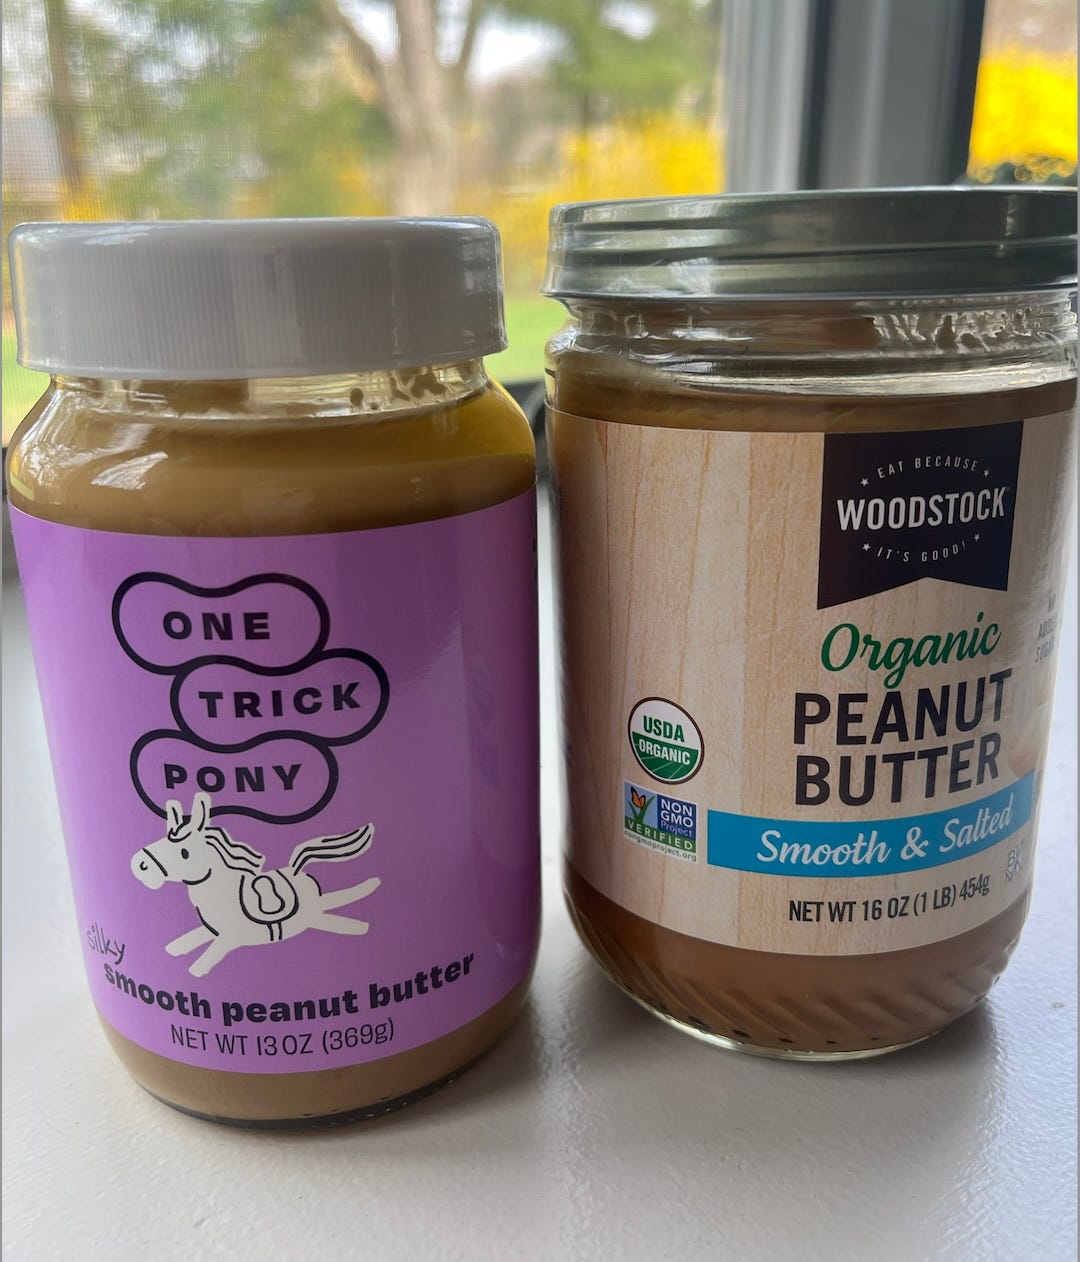
Use a peanut butter that has good spreadability. Many brands, whether natural or sweetened, include ingredients like palm or hydrogenated oils, which help prevent oil separation and make the peanut butter smoother and easier to spread. Rest assured, you can find natural peanut butters with great spreadability that are made from just peanuts—or peanuts and salt.
Two of my favorite brands, One Trick Pony and Woodstock Organic Smooth & Salted, keep it simple with minimal ingredients, are easy to stir (with minimal oil separation), and both spread beautifully.
Also, for more details on my peanut butter preferences, check out my full review of natural peanut butter brands from last year. (Note that Woodstock, a more recent discovery, was not included in the review.)
JELLY, JAM, PRESERVES, OR ALL FRUIT SPREAD:
Last, but certainly not least, is the “J” in PB&J, which traditionally stands for jelly, but can include jam (also a “J”), preserves (though PB&P just doesn’t have the same ring!), or all fruit spread.
Starting with some helpful definitions and distinctions:
Jelly is made from only fruit juice, not the whole fruit, plus sugar and pectin (a natural gelling agent found in the skins of fruits like apples). Jelly has a smooth, firm consistency that spreads evenly.
Jam is made from the whole fruit with added sugar and pectin. Jam contains some pulp and smaller bits of fruit inside. It has more texture than jelly, but is also easy to spread.
Preserves are made by cooking large or whole pieces of fruit with sugar. Preserves have a thicker, more textured consistency than jam or jelly, and some can be a bit more challenging to spread.
All fruit spreads have a smooth texture and are made with fruit and fruit juice concentrate as an added sweetener (often apple or grape juice concentrate), plus lemon juice concentrate and pectin. They’re a nice option if you’re trying to limit sugar. Just note that they’re less sweet and often more tart than the other options.
So, which one is best for a PB&J? Again, it’s a bit of a personal choice, but I usually opt for preserves for more real fruit flavor, texture, and some added sweetness. I also like how well it holds up in sandwiches (runny spreads aren’t my thing!). Sometimes, when I’m craving a less sweet sandwich, I will use an all fruit spread instead of preserves.
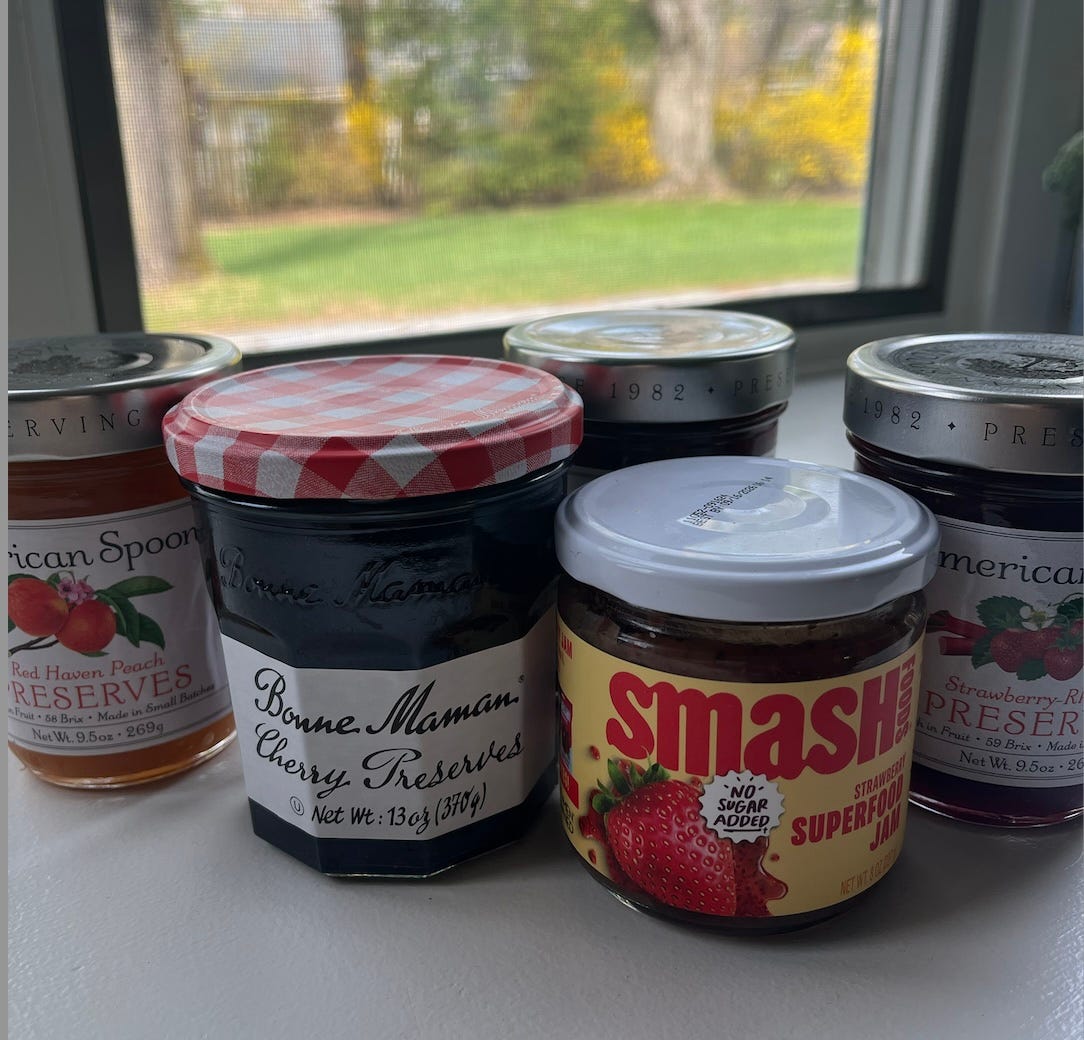
Strawberry, strawberry rhubarb, apricot, peach, sour cherry, and raspberry are my go-to fruit spread flavors, offering a nice tart-sweet balance. But grape is also a classic choice. I’m not a fan of orange marmalade, but I know some people enjoy that too.
The preserves brands I use most: American Spoon and Bonne Maman. They’re a bit of a splurge, but totally worth it for the quality—and a little really goes a long way. For a less sweet, more wholesome all-fruit option, I like Smash Foods Superfood Jam. It contains whole fruit, dates for sweetness, chia seeds for texture and health benefits, and lemon juice concentrate for flavor and preservation. Just note that this one has a slightly thinner consistency than other jams, so you may want to use a bit more in your sandwich to get the perfect peanut butter-to-jam ratio.
Quick food science note: If choosing jelly for your PB&J, keep in mind that some jellies soak into the bread faster than others. Look for one with a thicker, sturdier consistency, which comes from lower water content (many mass-produced jellies contain a lot of water) and higher pectin. Since sugar also acts as a thickener, avoid sugar-free options, which tend to be runnier. Lastly, for those prepping lunches the night before, fruit spreads with higher acidity, like strawberries and grapes, can cause the bread to break down faster over time.
OTHER ADD-INS:
While I’m a traditional PB&J gal, I’d be remiss not to share my thoughts on other popular peanut butter sandwich add-ins (often replacing the jelly).
Marshmallow fluff: I’m not a fan of Fluffernutter sandwiches, but this cloyingly sweet, extremely sticky spread has stood the test of time, so it definitely deserves a mention.
Honey: This one's a bit of a nostalgic trip for me. Growing up, peanut butter and honey sandwiches were on frequent rotation in my lunches. There was something about the crystallization of the honey inside the sandwich that I always found so satisfying texturally.
Bananas: Because bananas can brown and become soggy over time, a peanut butter and banana sandwich is best eaten immediately. Toasted or griddled bread also works well for this combo, as it holds the weight and moisture of the bananas better than plain bread.
Bacon: Elvis’s favorite sandwich is a peanut butter sandwich on white bread with bananas and bacon that’s griddled or pan-fried to take it over the top. While it’s not my personal preference, I can see how the different flavors, including the salty, fatty bacon, work pretty well together. I also love melty peanut butter, so there’s that.
Nutella: This variation feels a bit redundant—essentially nut spread on nut spread—but for those who have a strong affinity for peanut butter and chocolate pairings, it can be a fun change of pace.
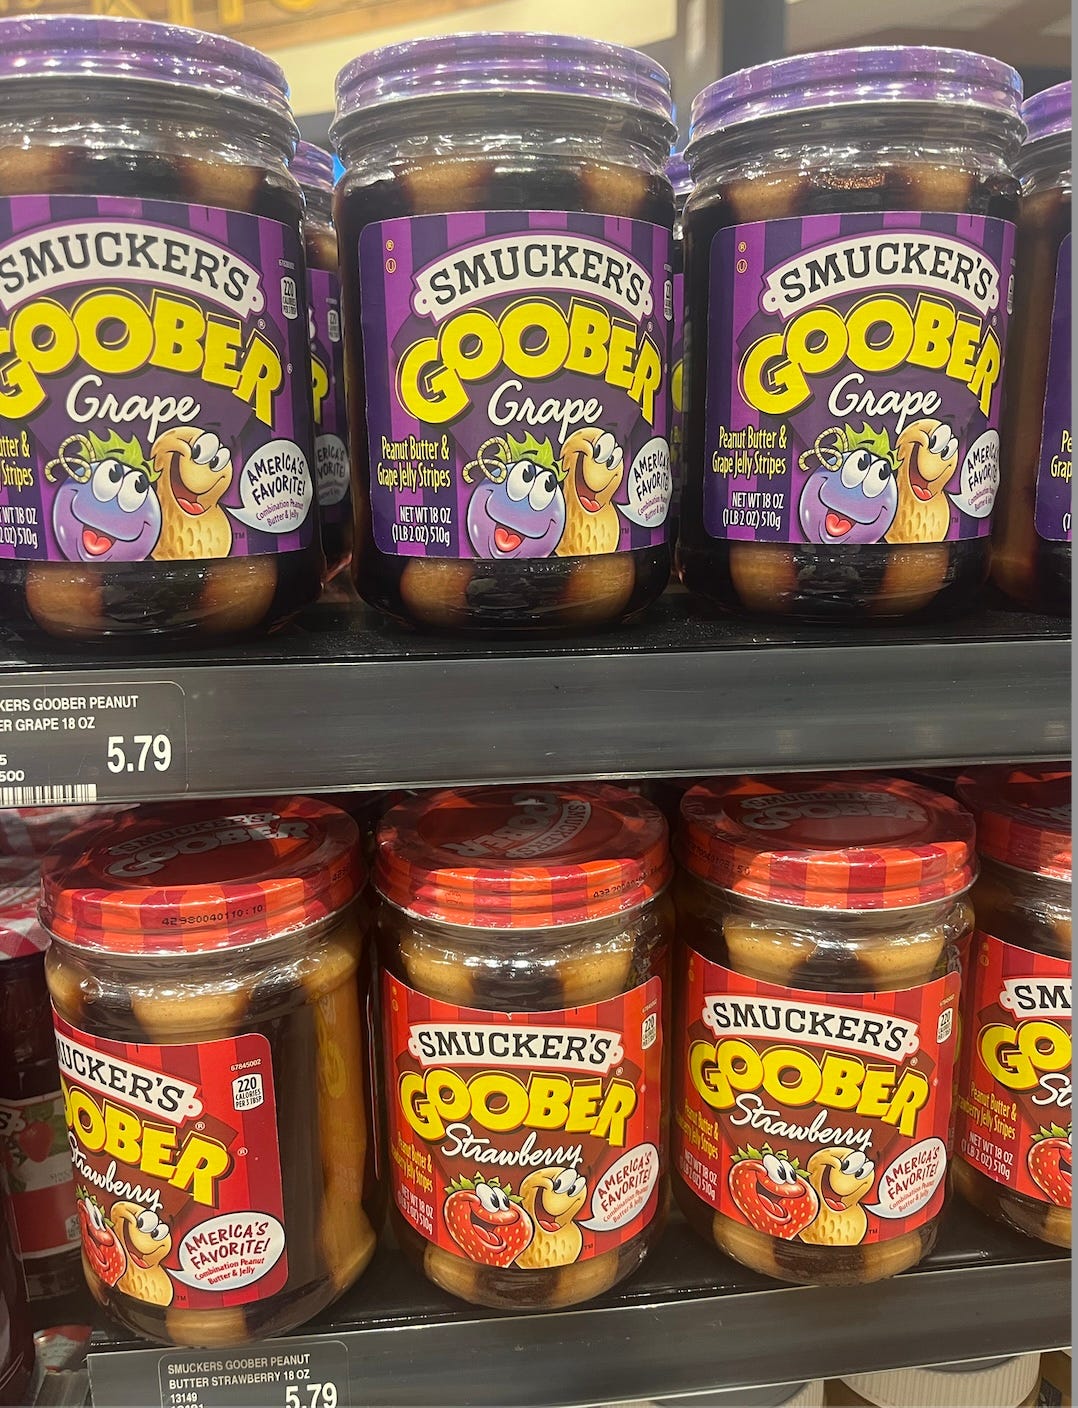
One final note on components: don’t cut corners by using brands that combine peanut butter and jelly in one jar, like Smucker’s Goober Grape or Strawberry. These are strictly off-limits in my perfect PB&J equation. (Though they do get points for their eye catching packaging!)
2. Construction technique mastery
While it might seem like anything goes when assembling a PB&J sandwich, there’s a very specific order of operations to follow for the optimal eating experience.
ASSEMBLY:
Start by laying out your two slices of bread. If you're making sandwiches for more than just yourself, lay out all the slices you’ll need to prepare them assembly-line style.
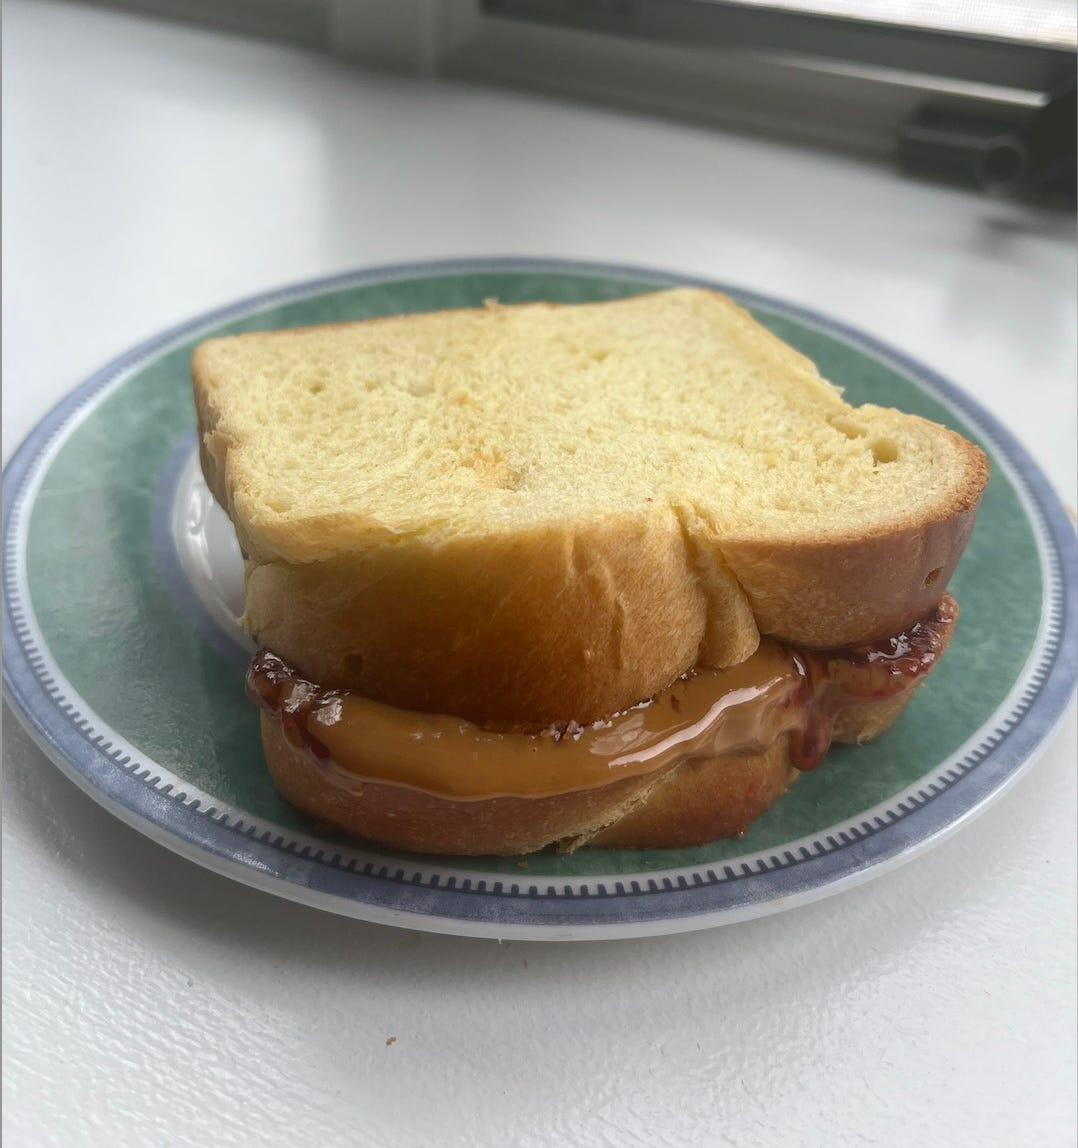
One critical (and often overlooked) detail: make sure your bread slices are properly aligned for assembling your sandwich. This usually means flipping one slice so the top and bottom crusts match up exactly. It might seem like a small thing, but that simple adjustment goes a long way in preventing overhang, uneven bites, or dreaded peanut butter and jelly seepage (gasp!).
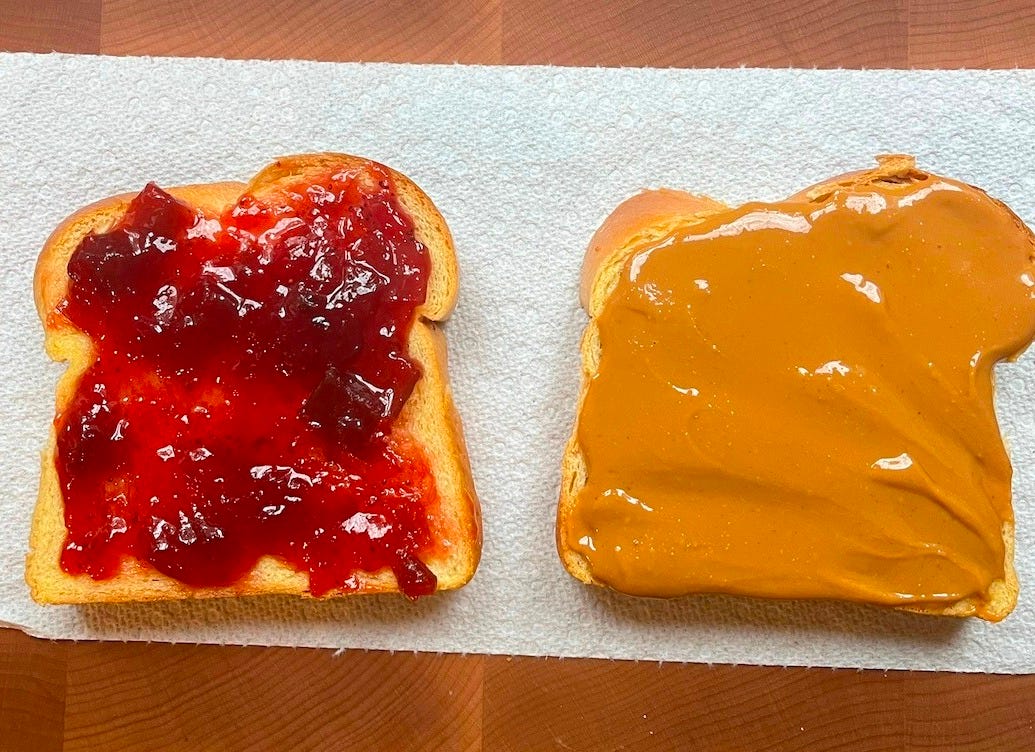
Start by generously spreading the jelly, jam, or preserves on one slice of bread using a butter knife. Why the fruit spread before the peanut butter? Simply put, it’s easier to clean a knife with jelly/jam on it than one coated in peanut butter. (Don’t worry, we’ll cover knife-cleaning in a moment!)
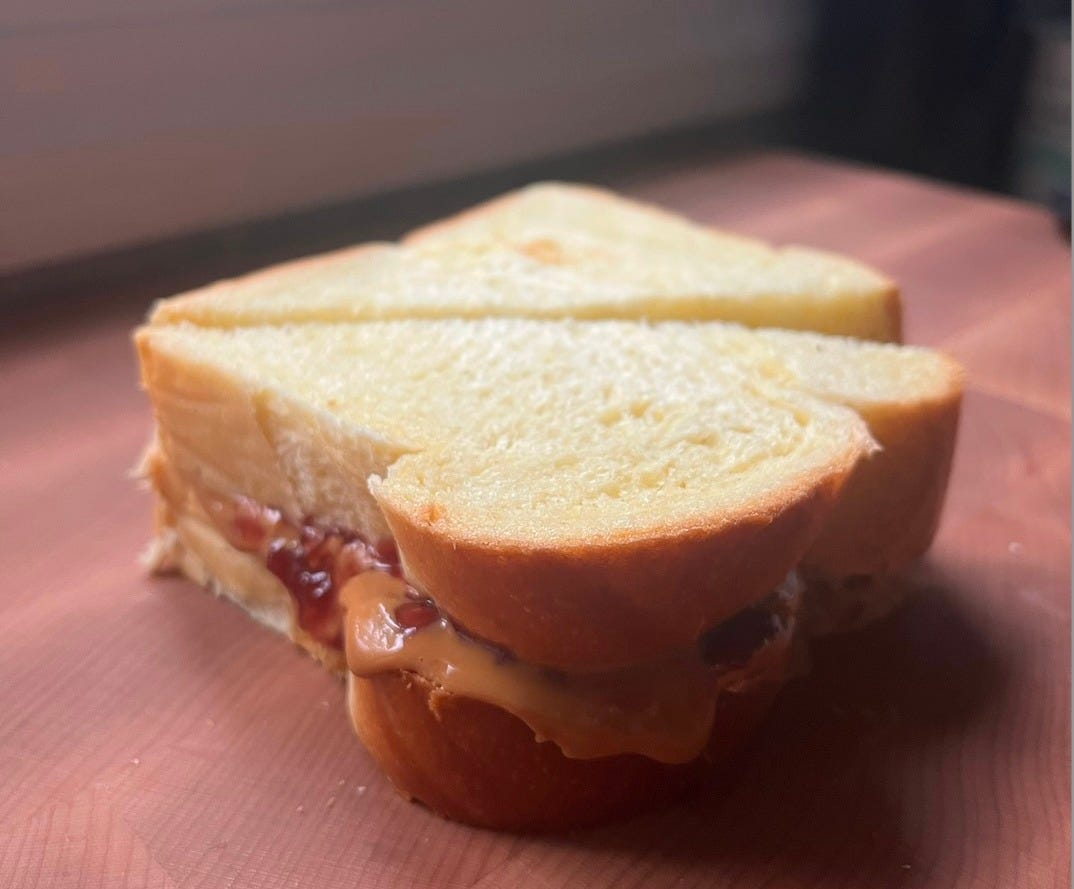
Make sure the fruit spread is distributed evenly to the edges of the bread without going over. When eating a PB&J, there’s little more disappointing than biting into the crust and tasting nothing but plain bread. As reference, in the photo above, I use about 1 to 1½ tablespoons of preserves (depending on how much whole fruit is in it).
Next, spread the peanut butter evenly on the other slice of bread. The amount you use is a personal choice. As a peanut butter fanatic, I like to really taste it in my sandwiches, but I also don’t want to go overboard to the point where a bite feels like it has cemented my mouth shut! In the photo above, I used about two tablespoons. Again, make sure to spread the peanut butter all the way to the edges of the bread so every bite has a good amount of it. This results in a roughly 2-to-1 ratio of peanut butter to jelly, jam, or preserves (or 4-to-3 when using 1½ tablespoons of jelly).
Whether I place the peanut butter slice on top of the jelly slice (or vice versa) depends largely on the consistency of the spreads. My rule of thumb is to put the slice with the thicker spread on top, which is less likely to make a mess. (Sometimes that’s actually the preserves!) Just be sure to align the edges when sealing the sandwich, which is easier if you’ve arranged the bread properly from the start.
A couple of last assembly notes:
Each ingredient deserves its own slice of bread. Don’t try to place both spreads on the same slice (unless you’re going open-faced). They won’t spread evenly, and trust me, you’ll just end up with a sticky mess.
Clean your butter knife between spreading the peanut butter and jelly to avoid cross-contamination. I usually wipe off any excess jelly on the rim of the jar, then swipe whatever’s left onto the clean slice of bread before switching to peanut butter. If you want to be extra precise, you can rinse the knife with water between steps. Not into that? Just use two knives—what’s one more utensil to wash?
As tempting as it may be, NEVER lick the knife between steps—because, well... germs. Once you’re done with the peanut butter step though (I use a separate knife to cut the sandwich), feel free to lick it clean before washing it.
CUTTING STYLES:
In my house, the best way to cut a PB&J is a hotly debated topic. My older son likes it sliced straight through (top to bottom); my youngest prefers it whole and uncut. Me? I’m team diagonal. Cutting it on an angle makes it easier to grip—especially for smaller hands—and offers the most satisfying first bites if you start at a corner. Plus, let’s be honest: it just looks fancier, which is part of the charm.
I use a serrated knife here, which is perfect for slicing through bread. A butter knife doesn’t do the job nearly as well.
3. Serving suggestions
Now that you've made your perfect PB&J, it’s time to dig in! But before you do, I highly recommend pairing it with a cold glass of milk (dairy or non-dairy) for the best experience. Milk offers a refreshing contrast to the rich peanut butter, balancing out the sweet fruit spread.
If you’re feeling extra fancy (some affectionately call it "highbrow-lowbrow"), a great wine to pair with peanut butter and jelly is Lambrusco, a lightly sparkling red from Italy. Its fruity, earthy notes complement the jelly, while the wine's subtle bitterness helps balance the richness of the peanut butter. Other excellent choices include Moscato d'Asti or a tawny port, both of which balance the creamy, salty peanut butter with the sweetness of the jelly. Cheers!
4. Tasty, creative twists on the classic
Like any beloved classic, PB&J has inspired countless recipes with creative twists. Here are a few delicious ones that are definitely worth trying:
Peanut Butter and Jelly Cheesecake, All Recipes
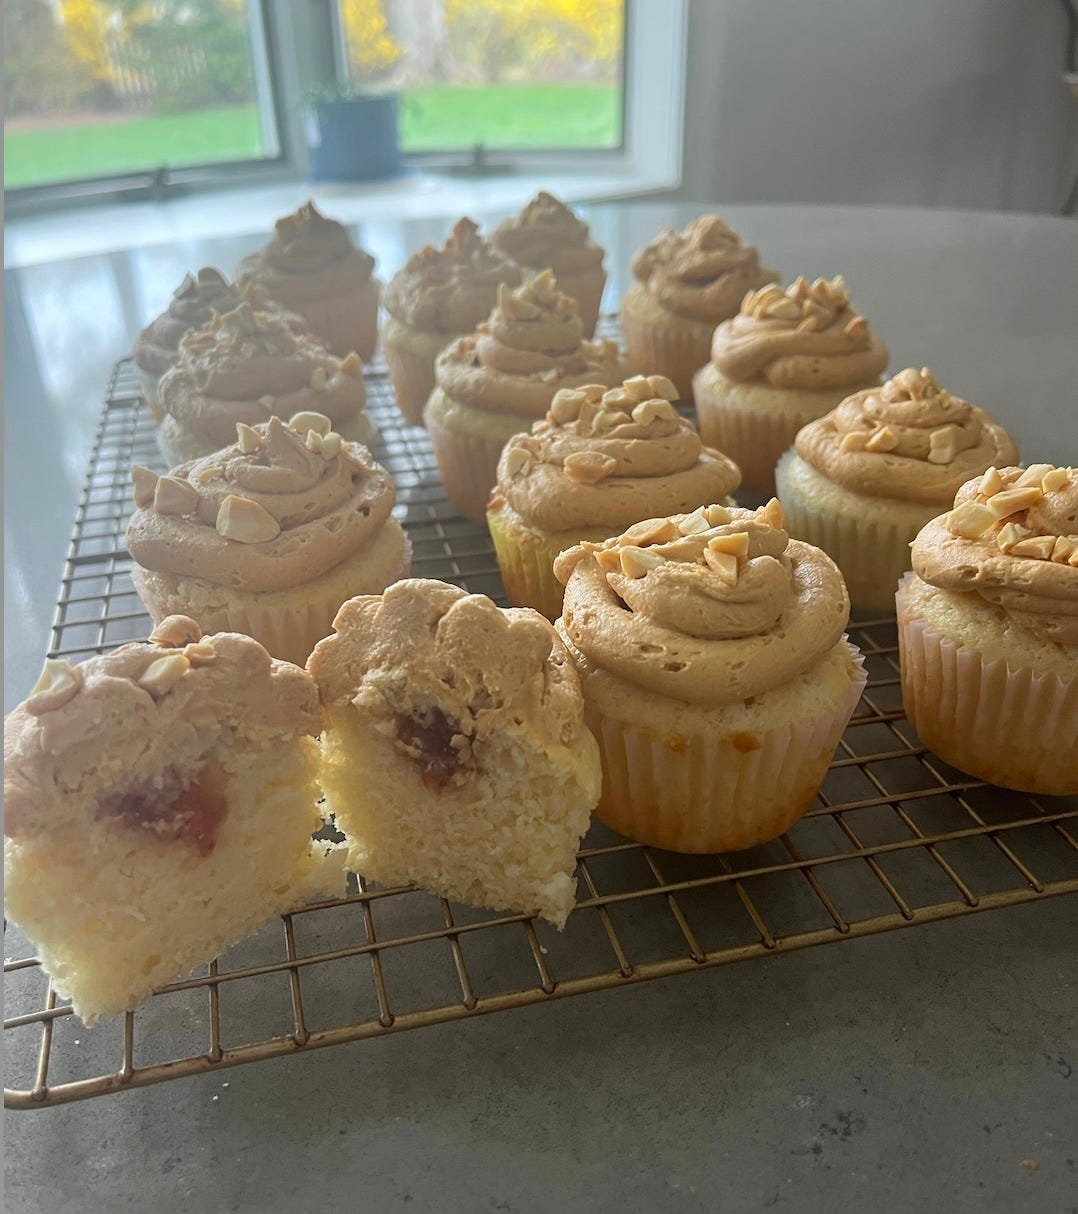
Peanut Butter & Jelly Cupcakes, Sally McKenney, Sally’s Baking
PB&J Bars, Jenn Segal, Once Upon A Chef
I’m guessing many of you have your own PB&J preferences and techniques shaped by personal experience, and I’d love to hear about them! Feel free to share in the comments below.
If you enjoyed this post, please tap that Like button below—it seriously makes my day, and it helps more people discover the newsletter too. Want to spread the PB&J love even further? Share this post with a few of your favorite foodie friends! 🙏
Have a delicious week!
PS: I may earn a small commission from some of the links provided in my e-mail. Which isn’t a bad thing, is it? 😊
Try toasted rye bread.... don't judge me...
Cutting style is such a big thing for me when it comes to PB&J sandwiches!