


8 Invaluable Lessons I've Learned as a Professional Recipe Tester
Plus, a few of the best recipes I’ve ever tested

Hi! If you’re new here, Dish Lister is a newsletter offering curated recommendations, honest reviews, and inspiring recipes, all designed to bring joy to both eating in and eating out. Whether you're a seasoned foodie or just looking to try something new, there's always something delicious to discover. Subscribe today to add a little inspiration and excitement to your food routine!
I’ve been testing recipes professionally for almost nine years. It all started with an externship during culinary school at the Good Housekeeping test kitchen and later grew into more regular part-time gigs with Savory and Fresh magazines (distributed monthly in supermarkets across the Northeastern U.S.). I also had brief stints testing recipes for Weight Watchers, Top Chef’s Gail Simmons’ book Bringing It Home (working with her collaborator, Mindy Fox), and Jenn Segal’s wonderful book, Once Upon A Chef: Weeknight vs. Weekend.
As a recipe tester, my main job is to follow the recipes I’m given, ensuring the directions are clear, all the necessary steps are included, and the final product turns out as intended—and, of course, tastes good. If there are any issues, I provide feedback to the recipe developer, offering suggested improvements for future versions. The recipe is then revised to incorporate those changes (sometimes after a bit of back-and-forth discussion), and I’m often asked to re-test it to make sure it works.
This experience has deepened my understanding of what makes recipes successful and how to write clear, effective instructions. Ultimately, it’s given me the foundation to create my own delicious dishes (which, I suppose, makes me a recipe developer now too!). As I’ve begun developing my own recipes, I’ve applied the same rigorous testing process I’ve become accustomed to, ensuring that the instructions make sense and account for any potential variations or challenges you might encounter.
Over the years, testing both others’ and my own recipes has taught me countless invaluable lessons that guide my everyday cooking. I’m excited to share some of that wisdom with you today. I’ve narrowed it down to eight key lessons. Although this is just the tip of the iceberg, I hope it proves helpful and gives you a little extra confidence (and sanity) in the kitchen!
Alright, time to dish!
8 Invaluable Lessons I’ve Learned as a Recipe Tester
#1: Read the recipe thoroughly first
I cannot stress enough how critical this step is. There’s nothing worse than starting a recipe, only to realize it requires an overnight rest in the refrigerator that you weren’t expecting, or you’ve started a three-hour recipe with only ninety minutes to spare. With my recipe tester mindset, I also can spot errors in recipes when I initially review them (like a missing step or ingredient in the instructions). It’s always better to identify these issues in advance, so you can course-correct.
#2: Don’t assume the recipe is always right
Not every recipe is tested with the same rigor. In today’s social media age, creators often create recipes on the fly while filming, then quickly jot down their notes to share with viewers. Writing clear recipes is a learned skill, and translating instructions so they’re easy to follow isn’t always simple. Just because someone’s an amazing chef doesn’t automatically make them a great recipe writer.
I mention this because some recipes are poorly written, not rigorously tested, or simply don’t work as intended, so you can’t always assume they’ll be reliable. For example, if a stew recipe calls for a certain amount of water but it’s not enough and the stew starts drying out while simmering, don’t hesitate to add more broth or water to keep it moist. Similarly, if a recipe suggests using one sheet pan for roasting but it leads to overcrowding, grab a second sheet pan to give the food space to properly brown.
Typos can happen too. While they’re easier to fix in online recipes, if the typo is in a cookbook, you may never know. Trust your instincts—if something doesn’t look or feel right (like using 1 tablespoon of salt instead of the intended 1 teaspoon), don’t be afraid to stray from the recipe and make the adjustment.
#3: Pay attention to reviews and comments
An online recipe’s ratings, reviews, and reader feedback can offer valuable insights, including successful substitutions and any challenges encountered. Passionate cooks are vocal—not only when they love a recipe, but more often when something goes wrong, sharing exactly what went awry.
On the New York Times Cooking app, unless a recipe has received five-star ratings from thousands of reviews, I always check the comments to see what challenges others have faced and devise a plan to avoid making the same mistakes.
And, of course, if you’re not up for the challenge of troubleshooting a recipe (and not everyone is!), you can always opt for ones that are thoroughly tested and boast rave reviews.
#4: Mise en place: the key to kitchen efficiency
Mise en place, a French term meaning “everything in its place,” refers to the practice of preparing and organizing all your ingredients and tools before you start cooking. It was one of the most important lessons I learned in culinary school and has been invaluable in both my recipe testing work and everyday cooking.
By chopping, measuring, and setting out everything you need in advance, the entire cooking process runs so much more smoothly. You can move seamlessly from step to step, saving time by avoiding the disruption of searching for and prepping ingredients as you go.
When everything is ready beforehand, I also find that I make fewer mistakes—like forgetting an ingredient or overcooking something while scrambling to find the next item. It’s far less stressful to avoid rushing around the kitchen, especially when making more complex recipes.
#5: Invest in good knives and keep them sharp
To geek out for a second: there are few things more satisfying to me in the kitchen than slicing an onion like it’s butter with a freshly sharpened knife. While you might not derive the same pleasure from this as I do, I promise your arm will thank you for easing the burden. A nice, sharp, good quality knife can be life-changing.
I’m not going to deep dive into knives here (that’s a post for another time!), but a high-quality set can last a lifetime with proper care. I’m using the same J.A. Henckels knives that I bought in my twenties, and they’re still going strong!
How often you sharpen your knives depends on how much use they get. In professional kitchens, where knives get constant use, it’s recommended to sharpen them every 3 to 6 months at least. For the average home cook, sharpening once every six months is ideal, but at a minimum, once a year is acceptable.
It’s also helpful to use a honing steel to maintain your knives' sharpness between major sharpening sessions. You can use the honing steel before and after each use, but using it every few uses is sufficient—and more realistic.
This is the electric sharpener I own and love. It’s so easy to use that I even let my teenage boys handle it. Zwilling also makes great sharpening stones if that’s your preference. And if you’re feeling extra motivated now, try a honing steel like this one.

#6: Salt your food properly (and why not all salt is equal)
There’s a reason Samin Nosrat dedicates an entire section of her incredible book, Salt, Fat, Acid, Heat: Mastering the Elements of Good Cooking, to this topic. If you want to dive deeper into the importance of salt in cooking, I highly recommend checking it out. In the meantime, here are my two cents based on my experiences.
One of my culinary school instructors always told us to salt our pasta water until it tasted like the ocean, and that has stuck with me. I used to taste the water in class to ensure it was properly salted. Now, I rely more on instinct and visual cues, but since many recipes are vague on the amount of salt, I’ve found it helpful to follow these general guidelines too:
Salt meat generously to help the seasoning penetrate deeply into its fibers, resulting in a more evenly seasoned, flavorful bite. Foods with higher water content, like vegetables, require less salt as they absorb seasoning more quickly. Ultimately, the amount of salt depends on the type of food and your personal taste (and health) preferences.
It’s easier to add salt than take it away, so start with less and adjust gradually to your desired level. When the flavors in a dish really pop, you’ve likely found the right balance. If you taste the salt itself, you’ve probably overdone it.
When a recipe says “season with salt to taste,” always taste first before adding more salt. You won’t know how much is needed without sampling. For raw ground meat (like meatballs or a filling), quickly cook a small piece to check seasoning and adjust if necessary.
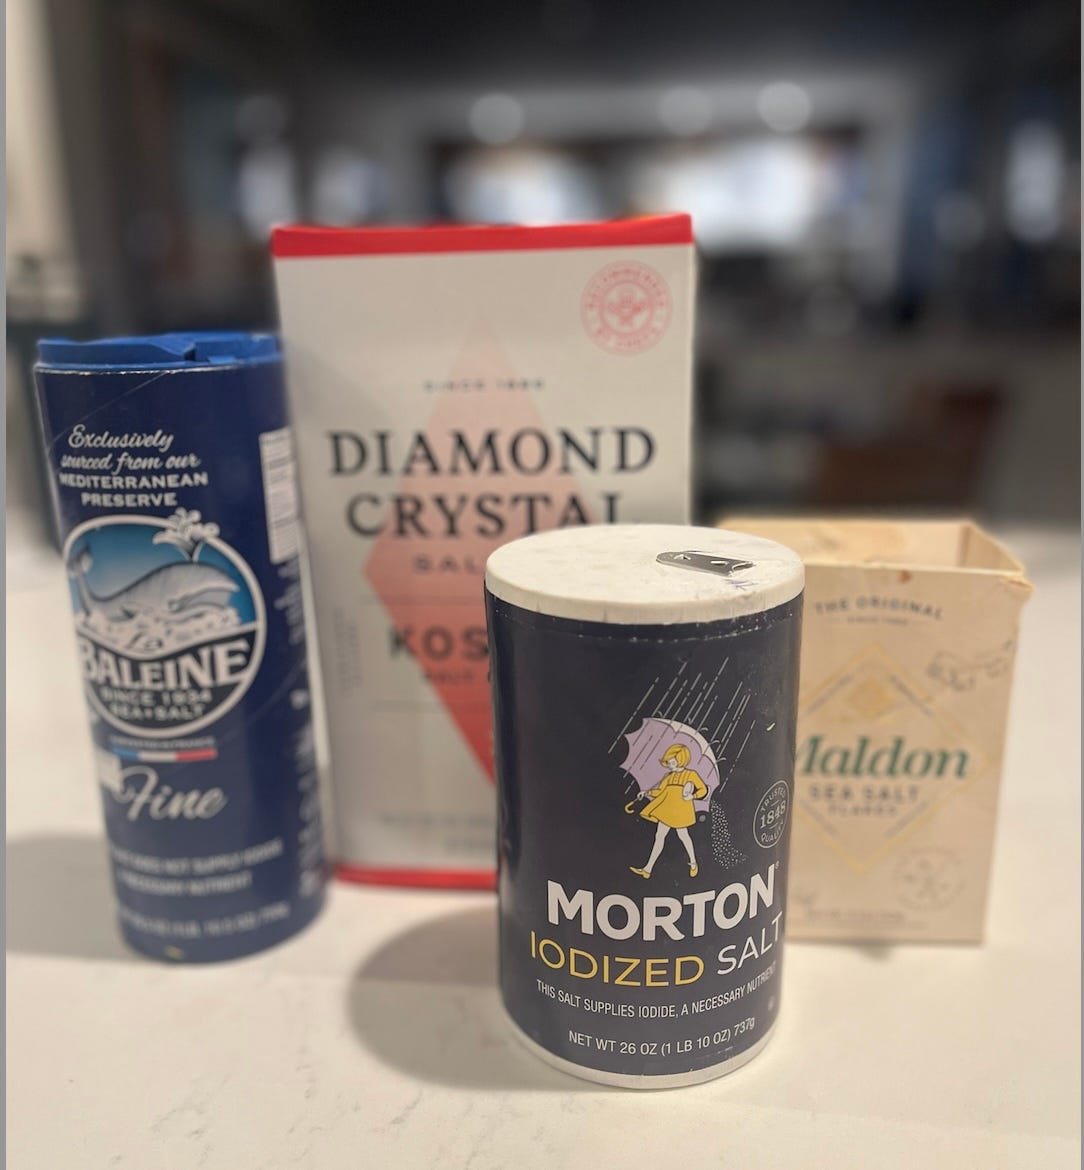
Lately, I’ve noticed more recipes specifying the type of salt—table salt, kosher salt, fine or coarse sea salt, flaky sea salt, etc. Some even mention the brand of kosher salt, since different brands vary in grain size and texture, which can affect the taste and balance of the dish. For example, Diamond Crystal Kosher Salt flakes are larger and less dense than Morton Kosher Salt, so one tablespoon of Diamond Crystal contains fewer flakes than one tablespoon of Morton. The size of the salt crystals also impacts how they dissolve in food. Larger grains, like Diamond Crystal, may not dissolve as quickly as finer grains, meaning you might need more Diamond Crystal than Morton to achieve the same level of saltiness (and vice versa).
#7: Use visual or tactile cues over timing whenever possible
Never rely solely on the stated timing for steps in recipes, as factors like your stove type or intensity of your heat source can affect cooking or baking times. Instead, use visual or tactile cues to determine when something is ready. Two to three minutes on one stove might take four to five minutes on another.
When I worked in the Good Housekeeping test kitchen, we always tested recipes on an electric stove after perfecting them on a gas range. This ensured consistent results and accounted for timing variations between cooktops, allowing us to establish a broader time range for the final recipe. That said, it’s important to understand your own stove—whether gas, electric, induction, or otherwise—so you can adjust for differences in burner heat and how quickly things heat up. My gas burners are more powerful than average, so I lower the heat slightly and often have shorter cook times than the recipe suggests.
I also rely on visual and tactile cues to assess doneness rather than solely following the suggested timing in recipes. It’s important to recognize when onions are translucent, know what the optimal sear on meat looks like, and how to tell when a cake is fully baked (since ovens are calibrated differently). You can check meat doneness with a thermometer or by pressing it with your fingers and comparing the feel to different parts of your palm.A more detailed explanation of that method can be found here.
#8: Understand the subtle differences in food measurements and other required preparations
Understanding the language and grammatical subtleties in recipes is one of the more obvious guidelines for seasoned home cooks, but it’s worth reiterating, since even I get tripped up on occasion. "Two cups of nuts, chopped" is very different from "two cups of chopped nuts" and it can affect the final quantity. In the first case, you’re measuring the nuts first and then chopping them; in the second, you’re chopping the nuts first and then measuring them. The same applies to "1/2 cup butter, melted" versus "1/2 cup of melted butter." See the difference?
Also, pay attention to any other instructions for preparations that need to happen before starting a recipe—like bringing ingredients to room temperature or sifting flour (remember, “1 cup flour, sifted” is different from “1 cup sifted flour”). These steps can impact the flow and timing of your cooking.
A few honorable mentions…
When chopping, try to cut everything as uniformly as possible. Not only does this make the dish more visually appealing, but it also ensures even cooking (e.g., when boiling potatoes for potato salad or roasting vegetables).
Clean as you go. Who wants to stare at a sink full of dishes while eating? Not me!
Music (and the occasional glass of wine for the chef) are key to maximizing enjoyment during the cooking process. No further explanation needed on this one.
Top Recipes I’ve Tested
Since I always like to share a little food inspiration in my newsletters, here are some of my favorite recipes I've professionally tested over the years. I’ve included links to the ones that are available online.
Savory: Air-Fried Beet Chips; Baja Fish Tacos; BBQ Chicken Meatball Sliders; Cheeseburger Bombs; Chili-Topped Sweet Potatoes; Cookie Cheesecake Bars; Gluten-Free Almond Cookies; Grilled Flatbread; Honey-Bourbon Ribs; Ice Cream Cupcakes; Margarita Cupcakes; Salad with Sweet Poppy Seed Dressing and Cranberries; Shrimp “Ceviche” with Watermelon; Spaghetti Squash Halves Stuffed with Spinach, Rice, and Cheese
Good Housekeeping: Buffalo Chicken Pull-Apart Bread; Caesar Deviled Eggs; Carrot Cake Skillet Blondie; Crock Pot Chicken with Walnut Herb Sauce; Double Cheesy Meatball Bake; Gingerbread Cake; Homemade Irish Cream; Kale and Roasted Cauliflower Salad; Skillet Pizza (with Homemade Dough); Soda Bread
Bringing It Home: Chili Grilled Cheese; Ginger-Chili Chicken Wings with Shishito Peppers; Greek-Style Lamb Meatballs Over Orzo; Mussels Steamed with Leeks, Mustard, and Tarragon; Spicy Pickled Pineapple
Once Upon A Chef: Weeknight vs. Weekend: Arugula, Crispy Feta, & Watermelon Salad; Asian-Inspired BBQ Chicken with Thai Cucumber Salad with Peanuts; Butter Chicken; Coconut Biscotti; Cucumber Gin Lemonade; Lasagna Soup with Ricotta Cream; One-Pot Chili Mac; Rack of Lamb with Dijon-Panko Crust; Vietnamese-Style Meatballs with Chili Sauce
Do any of these recipes stand out to you? I'd love to hear your thoughts in the comments below. And, if you do try any, let me know what you think!
If you enjoyed reading this post, please click the Like button below—it makes my day, and I’m told also helps others to discover my newsletter. You can further spread the word by sharing this post (button also below) with a few of your favorite foodie friends. 🙏
Have a delicious week!
PS: I may earn a small commission from some of the links provided in my e-mail (which isn’t such a bad thing, is it?).

Great article! You described everything I’ve learned the hard way… and then some…. 🩵🦋
This is helpful! I've found that, in addition to just making the whole cooking process more efficient, no. 4 (mise en place) is also a good way to force myself to do no. 1 (read the recipe first). I also appreciate the reminder to get my my knives sharpened. They're in sad shape, but I keep forgetting to do this until it's time to cook again... then I tell myself it's time to get them sharpened, then I forget until it's time to cook again, and so on.